Wednesday, October 19, 2011

Finally - I"m BAAAAAAAK!

Yes, its been a very long time since I posted on my blog. Projects that came up kept me busy, and they were not related to papercrafting. Although I had gotten quite disinterested in sewing, my daughter Katie had gotten me involved in some projects that got me sewing again. After sewing 11 double layered petti skirts for my granddaughter's dance recital, I realized I needed a new sewing machine. I was blown away by the new sewing machines and all they can do, I got a fairly basic sewing and embroidery machine. I'm hoping to trade up SOON!

Katie and I decided to try something new for this years season of craft fairs, and we chose tote bags and purses. I realized that all I needed was a good machine for me to enjoy sewing again! I also enjoyed the process of fabric selection and seeing my work take shape.

I'm also enjoying the embroidery part too. I always wanted to do this, but in the past, it was quite expensive for the designs which were only available on special cards. Now, I can download a few designs for a small cost.

Our craft show season is upon us. The first one was a big disappointment as we did not sell one thing. In talking to other crafters, they didn't do well either. We have 4 more - one this coming Saturday and three in November.

In the coming weeks, I'll direct you to our new website that my son in law is creating. It will feature sewing projects, embroidered T shirts and papercrafts. Yes, I'm still creating cards and scrapbooks. I'm currently looking for more ways to combine my two loves - papercrafts and sewing.

One way I've found to combine them is cards. I can embroider designs on fabric or specially designed paper and use it to create greeting cards. Here are a few examples.

This is the first one I made, for my daughter's birthday during the summer. Classic Pooh has been a favorite of Katie's since she was a baby. I embroidered on fabric, and attached it to cardstock. I used Elegant Edges for the frame, embossed with the Cuttlebug and added a few flowers.


This was created for my mom's birthday that we celebrated this past weekend. I embroidered the design on special paper for embroidery. I created this frame in Elegant Edges, using pre-embossed Core'dinations paper. Happy Birthday was cut using Create a Critter Cricut cartridge and "Mom" was cut using the font on PaperLace. Mom LOVED the card.

In the coming days, I will be posting my latest creations. I hope you will come back and visit soon!

Koala-t hugs,

Cathy

Sunday, May 15, 2011

My Craft Space


Its a room I spend most of my days. It has the creature comforts of my everyday routine - TV, DVD player, Computer, printer, a corner for my sewing and of course my paper crafting supplies and my Cricuts! When I moved into my current apartment, I figured since I spend lots of time crafting and creating, I made the master bedroom into my Studio. Its taken nearly 10 years to get it to the way I have it now and its a very enjoyable, comfortable space for me.

The window faces north so I don't get direct sunlight, but the room is bright on sunny days. The far corner is my computer area, the shelves above it store my Cricut cartridges. I have found that a U shape work area works best for me. I also like having many of my tools and accessories within reach, so I have the shelving above my work space and the rails and cup system (from Ikea) also above my work space. I like this arrangement because I prefer an uncluttered work area. My E2 is one one side, and in the lower left corner you can see my Imagine. Just out of the photo is my sewing area (I avoided this area because its a bit of a mess, as I've been helping my daughter with costumes for a play she's working on and skirts for my granddaughter's dance recital. Also out of the photo on the right side of the room is a row of Jet Max cubes. These are great for storage and look good too!


And here I am, smiling because I'm in my "happy place"!

Thanks for stopping by!

Koala-t hugs,

Cathy

Monday, May 9, 2011

My E2 Is HERE

Well, it arrived last Tuesday, but this is the first chance I've had to write about it! This is one slick machine! Even the new packaging is pretty nice!


First impressions - It seemed lighter in weight when I took it out of the box. Its profile is lower than the Expression and it is much more colorful! The front door, when open, rests higher than the Expression. I am thinking this is so the mat stays flat or even slightly higher than the roller so the paper does not bend off the mat. But this is just my own observation. Other differences I noticed - the silicone cover for the touch screen, and the silicone "plugs" for the connections for the Original cartridge, the Imagine Cartridge and for the add on to make the E2 wireless.

It was very easy to set up and once I pushed the power button, I noticed how bright and clear the touch screen is.
Because I'm a long time Gypsy user, I did have to re think how to cut not using the Gypsy. I wanted to try out the new cartridges that are included in the E2. The Owners manual for the E2 is very handy, listing all the buttons and what each function is for those buttons.

Within minutes, I was cutting a card using the pre loaded cartridge, Just a Note.

All in all, I do love my new E2 and can't wait to use it more and create projects to post here.

Tomorrow, I'll post card that I made using the E2.

Koala-t hugs,

Cathy

Thursday, May 5, 2011

Wearing My Other Hat

I've been doing a little more sewing lately and wanted to post a few things. I have sewed for over 35 years and enjoyed that time, but don't sew as much as I used to. My first love is papercrafting, but occasionally will make things for my grandchildren.

I made sailor dresses for my granddaughters when they were little and I wanted to make some for the twins. These are for my twin grandchildren, Jack and Juli. I will be shipping them to Japan tomorrow. It will be my first overseas package! I can't wait to see a picture of them wearing them! They've gotten so big since I last saw them in January.


I will be posting more in the coming days and weeks. I received my Expression 2 and Saturday is National Scrapbooking Day, so lots of fun things coming up!

Hope you are enjoying spring!

Koala-t hugs,

Cathy

Sunday, April 24, 2011

Want to Win a Cricut E2??

In about 24 hours, Home Shopping Network will launch the Provo Craft Fifth Anniversary Expression 2! Almost everyone in the Cricut world is anxious to too see the E2 in action. The ladies at Everyday Cricut are giving away a brand spankin' new E2! If you would like to get in on the fun, go to:

http://www.cricutholiday.com/

so you can find out the many ways you can have a chance to win the new E2!

I can't wait!

Have a great day!

Koala-t hugs,

Cathy


Friday, April 22, 2011

Fifth Anniversary of the Cricut Challenge

Happy Friday everyone!

This year, the Cricut celebrates its 5th anniversary, and in celebration, Provo Craft has released the E2, a new version of the Cricut Expression. The launch date is April 26 on Home Shopping Network.

As part of the celebration, Provo Craft had a contest to win an E2. Entries were to be a Birthday themed 12 x 12 layout, made with Cricut and our choice of cartridges.

I'm not one to do challenges, but I thought I would give this one a try. The first layout was quite challenging, the ideas were difficult to come by, but once I got started, I was able to complete 3 layouts (we were able to enter a maximum of 3). Five winners will be selected and many will be selected to be shown on HSN Tuesday.

Here are my entries. I've seen some of the others so far and they are fantastic! So many creative Cricuteers out there! I would be happy if mine are shown on HSN during the day of the launch.


This one was made using the Imagine. Using the Yummy cartridge, I cut the woman holding the cake and the flourish corners, border and "Celebrate" The photo mat sized to fit a 4 x 6 photo and the photo mat was cut using Elegant Edges (my FAVORITE Cricut cartridge), printed on the Imagine. Background paper is embossed Core'dinations.


This one was fairly simple. I cut balloons from the Celebrations cartridge, using various papers. Font is Zooballoo, "5" is from Mickey Font. Photo Mat is from Elegant Edges. Papers from Core'dinations and Die Cuts With A View.

This was the first one I completed and took the longest. I used the following cartridges: Elegant Edges for the photo mat and oval mat for the cake, Paper Lace for the font, Martha Stewart All Occasion for the banner flags, cake cut using Smiley Cards, and "5" candle from Sweet Treats. Papers from Core'dinations and Paper Studio.

Good luck to all the entries! It will be fun seeing all the different Layouts celebrating one of our Favorite Bugs - Cricut!

Have a wonderful weekend! Happy Easter and Happy Spring to all!

Koala-t hugs,

Cathy

Wednesday, April 20, 2011

SPOTLIGHT ON: PAGODA, Part 2

Here is another card I created using Pagoda. A truly unique cartridge with lots of potential.

I cut the screen at 5", at this size, it fit the width of an size A2 card. Flowers were cut at 4". I didn't put any greeting on this card, as it would be great for any occasion.


Tomorrow is Hello Thursday at the Cricut message board, where they show new cartridges. Its always fun to see the new cartridges that are coming out, even if I don't buy any, its always fun to see them.

Have a great day! Thanks for stopping by.

Koala-t hugs,

Cathy


Tuesday, April 19, 2011

SPOTLIGHT ON: Cricut PAGODA Cartridge

I purchased this cartridge for the Kanji characters on it, but discovered some really beautiful shapes on it.

This card is made with glazed cardstock that I inked to bring out the design. The fan was cut with the Cricut and the Pagoda cartridge. Happy Birthday was cut from Lacy Labels .


The next week or two will be exciting in the Cricut world. Thursday this week is Hello Thursday - where Provo Craft announces new cartridges. Next week, the Expression 2 will be launched on HSN in celebration of the 5th anniversary of the Cricut. I'm very excited about this updated version of the Expression. Later in April or early May, depending on how the beta testing is going, the Cricut CraftRoom will open up to all. Its a on line software to design and create to cut to our Cricut machines. I'm excited about all these happenings!

Hope you are having a great week. Its been gloomy and very rainy here...we even had some snow yesterday. Lets hope we have a nice day for Easter and that it won't be long before we are enjoying the blooming trees and flowers and warm, summer breezes!

Koala-t hugs,

Cathy

Thursday, March 17, 2011

Making Unique Papers with the Imagine


This is part two of my experiments making my own paper designs using white glazed and pearlized papers that are on the market these days. Yesterday, I showed you the results I obtained using these papers with inks and glimmer sprays.

Today, I am showing the results I obtained using my Cricut Imagine and these same papers.

When the Imagine debuted last summer at CHA, the demonstrators talked about using glazed papers. I went on the hunt for these papers and found them at Archivers. Made by Bazzill, its their famous textured cardstock with a glazed design on the paper and at $2.00 a sheet, it was more than I like to spend on paper. I was anxious to try out this method so I purchased a few sheets in white and cream colored sheets.

These first examples, I used Colorbok white textured cardstock (on the left) and the example on the right is the Bazzill glazed cardstock in the cream color. I liked how the colors looked deeper, the green/blue seems more intense too. Once I printed the papers in the Imagine, I took a cotton round and rubbed the ink off of the glazed areas. It did blur a bit on the edges of the paper along side the glazed design. I liked the way it turned out.


Here is another example, using the same papers (but the Bazzill glazed is on the left side) Its kinda cool how the glazed design shows and the deeper colors of the printed design.


Here is a close up of two more examples. Both of these papers are from the SEI pearlized paper stack. The design you get depends on how much or how little glaze there is on the paper. The paper on the left is mostly glazed and the swirls are the areas that retained the print of design from Imagine. The one on the right retained most of the printed design from the Imagine, as the glazed area was smaller. You can see the little flower designs on the paper.


Here is another photo, of the above papers.

Here is a layout I created using these papers. Both are from the SEI Pearlized stack and printed using the full 12 x 12 printing method on the Imagine. I used Cricut Cartridges Cindy Loo cartridge for the frame and the scalloped circle for journaling; Pagoda for the Kanji symbol and flower, and Gypsy Wanderings for the word Journey.


I hope you enjoyed today's feature. I enjoy creating these papers and look forward to creating more!

Happy St. Patrick's day!

Koala-t hugs,

Cathy

Wednesday, March 16, 2011

Making my Own Papers


No, I'm not cutting down any trees, but I am using different methods to give me a wider variety of paper colors and designs.

I recently heard about some unique paper called Color Me. Its where you can use inks to create your own color paper with a design already printed into the paper. Since I'm impatient and couldn't wait for this paper to arrive, I thought I'd do some experimentation.

In my paper stash, I had a package of White Elegance from s e i. Its a white on white paper,described on the stack as "pearly foil papers". I had made a wedding book with this paper and had some larger pieces to experiment with.

I first tried Distress Ink with a cosmetic sponge and applied it to the paper. Now, I'm not the greatest when it comes to inks (or anything messy for that matter) But I was happy with the results. Here are some of my experiments.


I received a different effect with each patterned paper I used. I have always loved the watercolor colored papers and designs and that is what I was going for. The paper would soak up the ink more in the "unglazed" areas of the paper and depending on how much or how little was on the paper is how light or dark the paper became. I did use a clean cotton square to rub the ink into the paper and to remove the ink on the glazed areas. All these are great for future card backgrounds

I used glimmer sprays on the next three examples. I was not very happy with these, as they (I used Luminart Radiant Rain) have a high water content and will warp the paper. If I want to use these, I will need to flatten them out. The effect is ok, but I really liked the inks better. I had more control over how much ink and where I wanted it and the ink didn't soak up the paper like the spray did. Because of the high water content, I only used one color on a card.

Then I attempted to do an entire page. I used Bazzill's fairly new Glazed Cardstock. This one is white with white glazed images. On this particular sheet, its cupcakes. This is how it came out.

Pretty cool, eh? This will be great for a birthday layout for one of my granddaughters book.

So, with all the inked papers I had, I was able to create a few cards.

The first card was made with images from the Cricut Pagoda cartridge and the greeting was cut using Paper Lace.


I also used Paper Lace on the circle design with greeting.

Hope you enjoyed today's features. I love creating my own colors of paper and I'm anxious to find more papers that I can use with this method.

Tomorrow, I will show you the papers I created using my Imagine!

Thanks for stopping by and have a great day!

Koala-t hugs,

Cathy

Monday, March 14, 2011

Monochromatic Birthday Card

Time to get back to crafting! Hi all! Hope you are having a great Monday. I appreciate all that have been visiting in the past month when I've been AWOL from my blog. I'm back and hope you all continue to visit.

Today's feature is a card made with several layers and one of my favorite papers - Core'dinations. I used this paper for the background, embossed with a Sizzix folder and sanded a bit to bring out the dots. Cricut Cartridge Cindy Loo was used for the open scalloped circle and its shadow. The shape is the circle design with the deer (page 69 of the handbook) and I used the Gypsy and the Hide Contour feature to remove the detail in the circle and just leave the open scallop design. The top circle with the greeting was cut using Cricut Cartridge Paper Lace - which is one of my current favorites!

I tend to go for less is more and like the simpler cards.

Thanks for stopping by! Hope to see you soon.

Koala-t hugs,

Cathy

Sunday, February 13, 2011

Cute Critters Cards

Happy Sunday everyone! It was an absolutely beautiful day today! The sun was brilliant and it felt good to be outdoors. The only reminders of the winter so far are the mountains of snow that still obscure the landscape. I know, I need to be patient and if the weather forecasters are correct, we will have above freezing temps all week. I'm anxious for the snow to be GONE!

Today's feature are a few cards I created using Create a Critter. I originally purchased this cartridge because of the adorable koala on it. The other critters are equally cute and I hope to make more of them into cards.


For this card, I cut the koala at 3", the balloons at 1 1/2", Happy Birthday was cut using Gypsy Wanderings at 1 1/2" and the grass cut at 1 1/4". Background paper is from the Core'dinations stack Core Impressions by JilliBean. I used Glaze pen for the Koala's nose for a bit of shine.


I also used Core Impressions paper for this card, koala cut at 3", happy birthday at 1 1/2" and heart balloon at 2", all cut using Create a Critter. EK Success border punch used for trim.

I used Core'dinations White Wash (blue) for background paper and all cuts are from Create a Critter cartridge.

Thanks for stopping by. I hope you also had a day with sunshine, but if it wasn't I hope my cards brightened your day even just a little bit.

Have a great evening!

Koala-t hugs,

Cathy

Wednesday, February 9, 2011

Rock Princess

Hi all! My hibernations continues, as the temps hit new lows. Looking out the window and seeing the bright sunshine, its very deceiving. But hope springs eternal, watching the local weather and seeing how the temp is predicted to climb into the 30's by the weekend. In comparison, it could be shorts weather! hahaha In any event, its another day closer to spring!

Today's project is one of my recent favorites. I was trying to decide on what card to make for my granddaughter's 6th birthday and I had made a few, including this one. But I realized she's still too little for the Rock Princess theme, but I love the way the card turned out.


The girl was cut using Rock Princess Cricut cartridge at 4". I cut the hair from white card stock and colored it in with Copic markers, as I wanted it similar to the color of my Granddaughter's hair color. The curtains were cut using Twinkle Toes. The background paper is from DCWV. I used stickles to add dimension to the bows and the peace sign on her t-shirt and the boots. I also use a Glaze pen for the Guitar.

Thanks for stopping by today and hope you have a great day!

Koala-t hugs,

Cathy


Monday, February 7, 2011

Let's Hear it for the Boys/Men

Hi everyone! Hope you are having a good Monday. A quick look out the window reminds me its STILL WINTER and I want it GONE! I used to think January would drag by, but February isn't going any quicker. Here's hoping for a thaw SOON!

In making greeting cards for many years (started in 1994, when I got my first computer), I've always had a bit more difficulty making cards for the males in the family. Unless there is a specific theme I could use (music or sports) it can be tricky making cards for the guys.

I created three cards that are "non frilly" that would be good for the guys and their birthdays.

I used the DCWV Naturals stack for all three cards. The greetings are from Paper Lace cartridge and the shapes are from Lacy Labels. I also used EK Success border punches.


I love the colors of the paper in the Naturals stack and perfect for these cards!

Thanks for stopping by!

Koala-t hugs,

Cathy

Saturday, February 5, 2011

A Very Sweet Treat


Happy Saturday everyone! Hope you are enjoying life where ever you may be! I had the granddaughters here over night and they went home a little while ago, and its very quiet!

Today, I wanted to brag on my daughter a bit. She has wanted a Cricut Cake since they first came out, but couldn't get one. Last fall, I happened to stop by Michael's Crafts and found one for a great price. They were clearing out all the Cricut Cake machines and accessories 60% off and I knew Katie would love one for Christmas. I bought it then called my son in law, asking if he wanted to give it to her for Christmas. So between Keith and I we gave Katie the Cake, the tool kit, mats, blades and 3 Cake cartridges. She said she wasn't too surprised (don't know how she figured it out) but I know she was pleased with the gifts. (Granddaughter Kayla said she hugged the box when she opened it tee hee)

Anyway, after some practice, she made her first cake...for Kayla's 6th birthday in January. Here is the finished product.


She used chocolate fondant for the two layers and dyed gumpaste for the words and butterflies and there is a border around the second layer that's not visable. The Cake was yummy (yellow layer on top and chocolate layer on the bottom) even the chocolate fondant was pretty good!

She learned quite a bit for her first attempt and I can only imagine the cakes she will make in the future!

Have a great Saturday....hope you stop by soon!

Koala- t hugs,

Cathy

Wednesday, February 2, 2011

Scrapbooking - We've Come a Long Way!

Hi all! Hope you survived the storm so far. With all the bruhaha regarding the storm, I had forgotten that today was Groundhog Day. The little furry guy in Philadelphia didn't see his shadow today, and that's supposed to mean an early Spring.....well, only time will tell. After the past few days, I'm sure there are lots of folks that are hoping the groundhog is correct! Keep your fingers crossed!

Today, I don't have a project, but a bit of a "blast from the past". I recently went through a bin I had in storage of momentos and a scrapbook I had made in 1970! I am working on a "Book About Me" for my grandkids. I have lots of photos, but remembered this old scrapbook I had made that held some other memories I could add to the newer book.

Here is a photo of the book. When I see this book - the pages were similar to construction paper and the book was assembled with a shoestring looking thing, I realize how far we have come regarding the saving of our memories. I'm sure the pages of this book are NOT acid free and certainly not archival quality - the pages were falling apart!

I think I used Elmer's glue to attach everything. I used scissors to cut out everything (and not really straight) and there was no flair or creativity to the pages! And most of the pages held greeting cards I received over the years. Infact, many of the cards are from people I didn't remember who they were!


I like how this hobby/craft has developed over the years. I think with all the tools and supplies we have available to us, the more it sparks my creativity.

I took the book apart (the paper of the pages was just about crumbling in my hands) and I saved the parts I wanted for my new book. I have programs of plays I was in during High School, graduation ribbons, tickets for concerts I attended....it was also fun to go down memory lane and be reminded of the events of my past.

I am working on my Book About Me....and I can't wait until I finish it!

Have a great day and thanks for stopping by!

Koala-t hugs,

Cathy

Tuesday, February 1, 2011

A Little Fancy

Hi all! Well, the Blizzard of 2011 is upon us! The snow is blowing, the wind is howling and I"m so glad to be warm and indoors! Hope you are all safe and warm.

Today's feature are cards I created using two cartridges with similar names. One is Paper Lace and the other is Lacy Labels. Lacy Labels is one of the Cricut Lite cartridges only available from Walmart. I purchased it last summer and it has some wonderfully elegant shapes on it. Paper Lace was released late last fall and it also is very elegant.

This first card was made with shapes from both the Paper Lace Cartridge and the Lacy Labels Cartridge. The paper is DCWV Elegant Stack using the ivory and rose color sheets and the Metallic Stack using copper colored paper. The bottom layer of paper was embossed using a Sizzix folder in the Cuttlebug. The flowers were also cut from Lacy Labels. The greeting was cut using Paper lace. I put a little bling in the centers of the flowers


This next card was created using Paper Lace. The background paper is DCWV Natural stack. Its difficult to see in the photo, but its one of the foiled papers. This stack has some beautiful designs in it! The circle greeting was cut using Paper lace. Simple but elegant!
With the weather as it is, and I won't be going anywhere anytime soon, I'm hoping to get some projects completed. The snow is coming and the only thing I can do is PRAY FOR SPRING! =~D.

Have a great day!

Koala-t hugs,

Cathy

Monday, January 31, 2011

Happy BIrthday Kayla (card)

Hi all! I hope where ever you are you are safe and warm. The weather forcasters are all a twitter due to the "Blizzard of the Century" that is to arrive sometime tomorrow night. Living in the midwest, you would think we would be accustomed to this kind of weather, but the way they talk on the news, sounds like it is the end of the world! tee hee


On to today's feature! My oldest granddaughter celebrated her 6th birthday in late January and I needed to make her a card. She is in her 4th year of dance class and thought the images on the Twinkle Toes cartridge were perfect for her.

I made one just like this one, except for the dancer, I made the hair color to match Kayla. I realized that night I hadn't taken a photo of it, so I made another for my birthday card stash.

I cut the dancer at 4 3/4" tall. The drapes for the background is another image on the Twinkle Toes cartridge, but I used my Gypsy to stretch and narrow to fit a 5 x 7 card. I used a bit of Stickles for the bows in her hair.

I can't wait to use more of the images on this cartridge for layouts and cards for my two granddaughters that are in dance!


Thanks for stopping by!

Koala-t hugs,

Cathy

Saturday, January 29, 2011

Using Wrap It Up Cartridge

Here are a few more birthday cards for my stash. I had gotten the Wrap it Up cartridge, mostly for the unique boxes on it, but there are lots of phrases on it, great for cards.

This first one has a cupcake welded into the phrase for a simple birthday card. I used card stock from the DCWV stack Sweet, Corner is a Sizzix die and I used Stickles on the cupcake and on the corner.

Make a Wish with the balloons is also a cut on the Wrap It Up cartridge. I cut the balloons in white and colored with Copic markers. I used Stickles on the balloon and on the phrase. The background paper is from the Paper Studio Birthday Extravaganza stack.

Today, I've been on the computer all day! I've been looking for all the information I can find coming out of CHA Winter in Los Angeles. Facebook has been a great place for information. The new items from Provo Craft are the Expression 2 and the Cricut Craft Room - on on line design software. From the movies coming out of CHA, it looks GREAT! And I was looking for a new Expression as a backup (I've had my current Expression for several years, and I know it won't be lasting too much longer) I had been looking at the Black Friday Expression at Walmart, but was waiting for the price to come down. Now, I think I'll wait for the Expression 2 to come out!

CHA is for two more days and I'm sure there are lots more things to see.

Have a great Saturday!

Koala-t hugs,

Cathy

Friday, January 28, 2011

Using my Imagine

Hi All! Happy Friday! Winter still has its icy grip on the suburbs of Chicago, so I plan on staying in and creating for the next several days. The fridge and pantry are well stocked and I have no birthday parties or family commitments so it will be nice just to "hibernate" and be creative.

The projects selected for today were created using my Imagine. I don't use it all the time, but when I want to create something unique, I will get out my white cardstock and get to printing and cutting on the Imagine.

This first card, I used the Yummy cartridge for the flourish corners and background papers. I love the flourishes on this cartridge. Happy birthday was cut using Create a Critter and I used Stickles for the letters. For the one layer of the background paper, I used a white on white paper from SEI and printed on it with the Imagine. Then I took a cotton swab and rubbed the ink off the 'glazed' areas for a very unique effect. I will do a separate post for this paper on another day.


I used Yummy on this card also to create the ice cream sundae and the border. For more dimension, I used stickles for the chocolate sauce, whipped cream and cherry. The border is from the Martha Stewart All Occasion cartridge, using the print from Yummy. The background paper is from the DCWV stack Sweet.


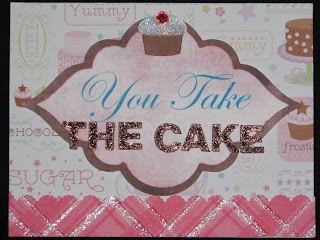
After making many, many birthday cards, I look for unique greetings on the front of the card. When I saw this in the Yummy cartridge folder, I thought it would be great for a card. I cut the front in layers...the background is one layer in brown, the layer of pink with the words You Take, and the words THE CAKE the top layer. I used Stickles to give dimension to the cupcake and the words Background paper and border are from DCWV stack Sweet, and border punch by EK Success.


I want to experiment more with my Imagine to create more unique projects. I can't wait to try more of the glazed and white on white papers in the Imagine and see what effects I can get!

An exciting weekend is coming up, with CHA Winter starting Saturday, January 29. Its always fun to see all the new products previewed for crafters of all kinds! I look forward to seeing what Provo Craft has in store! I also like to see what is new and innovative for scrapbookers and papercrafters! Although it would be so much fun to be there in person, I will enjoy watching the blog posts and videos that will be released.

Have a great day!

Koala-t hugs,

Cathy

Thursday, January 27, 2011

Happy Birthday Jack and Juli

Today's feature are cards I made for my twin grandchildren. They don't officially turn 1 until February 18th, but since they moved to Japan, we celebrated their birthday early.

The first card was for Jack. Used Pooh and Friends cartridge and cut Tigger out at 5 1/2". Hip Hip Hooray was cut from Create a Critter.


This card was made for Juli. Piglet was cut using Pooh and Friends, at 5", balloons cut using Celebrations and Happy Birthday from Gypsy Wanderings. I colored in the balloons and characters using Copic markers.

The background paper was from the Birthday Extravaganza paper Stack by Paper Studio (Hobby Lobby's line ).

Its going to take some effort to get into the habit of posting every day, but I'm working towards that goal! I hope you visit often!

have a great day!

Koala-t hugs,

Cathy

Tuesday, January 25, 2011
Back in the Saddle Again...

Yes, I'm back. I took a little break from blogging. At first, it was because things were so crazy busy. First it was the craft fair in November, then the three weeks I spent sewing princess dresses for my granddaughters. I then made quite a few gifts for the grandkids for the Christmas. I made robes and jackets and nightgowns. By that time I knew I had done enough sewing to last me for a long time. Before I realized it, its nearly the end of January and I'm ready to return to blogging and showing my work.

Although I was away from the blog for quite a while, I have been creating. I've been making cards, mostly birthday cards. With all the birthdays in my immediate family, it will be nice to have the cards made in advance. Also, I have plenty to post here on the blog.

For today's post, I am showing some t-shirts I created for Christmas gifts. I used the iron on transfer sheets, and printed and cut in the Imagine.

The first one was made for my Granddaughter Juli. I used the Sugar and Spice cartridge for the Snuggle Bunny image.


I made one of these t-shirts for each of my twin grandchildren. I used the font from the Paper Lace cartridge for "Nonnie". Heart shape from George and "ME" from Opposites Attract.


In the coming days and weeks, I'll be posting lots more often. Its good to be creative again and I hope you'll come back to see what I've been creating!

Have a great day!

Koala-t hugs,

Cathy