Wednesday, October 28, 2009

Its Almost the Witching Hour


Halloween is right around the corner. The past two days, I worked on my 4 year old granddaughter's costume. She is going to be Minnie Mouse - with the costume she wears in the Mickey Mouse Playhouse show. A few weeks ago, when we went looking for fabrics, Kayla was still undecided as to what she wanted to wear...we looked at patterns and fabrics. We nearly settled for Dorothy from The Wizard of Oz, and for some reason, she said she wanted to be Minnie. We looked for red polka dots (or as Kayla corrected me - red with white polka dots). We didn't find the big dots, but then she suggested pink and Kayla spotted the bolt of fabric with the big white dots on a very pretty pink background. She tried on the costume today and danced around for nearly an hour. But the best part was when she gave me a big hug and thanked me for making the costume! I will be sure to get photos of her on Saturday with her ears and "shiny shoes" and all and post it here for all to see.

I had this idea in my head when I wanted to make a Halloween card. I created this using my Gypsy, using the Gypsy Wanderings and A Child's Year cartridges. (and George for the Moon)

Thanks for stopping by....

Koala-t hugs,

Cathy

Sunday, October 25, 2009

Fall Colors


I'm not sure, but it seems a sure sign of "age" is when a person says "where did the time go?" In my case, maybe its because of my upcoming birthday, or its just the time since I last posted seemed to fly by! In any event, October is nearly over and I"m trying to figure out what kept me so busy!

Every year, I see how beautiful the leaves are as they turn their autumnal colors, and I say "I need to get out and get some photos of these beautiful colors" but I never get around to it. Well, this year I DID! It was a beautiful fall day, I grabbed my camera and drove around the neighborhood snapping pictures.

This one was taken behind my apartment building. I love the contrast in colors between the two trees and how they look against the brilliant blue of the Sky. Fall colors, earth tones, are some of my favorite colors. Nature's artwork always leaves me awestruck.

Please enjoy the photo and I hope you are enjoying Autumn colors where ever you are! I'll be back very soon to post more projects I've accomplished in recent days!

Enjoy the rest of the weekend....and have a great week!

Koala-t hugs,

Cathy

Friday, October 9, 2009

Koala-t Kreations Cards

Anyone who knows me, knows how much I love koalas! I have them all over my apartment in various shapes and sizes. Figurines, stuffed toys, paintings, clocks, artwork, books, the list is endless.

I've been wanting to bring my love of koalas into a line of greeting cards, I made a group of sketches from the books and photos I've collected over the year. Many of the sketches I made were created using photos my daughter, Katie, took when she visited the San Diego zoo's koala park.

Here is the first group of cards I created. The supplies I used:
Copics to color the Koalas, 2 different leafy designs of Cuttlebug embossing folders, Core'dinations White wash,and Neutrals paper. scalloped circles created using the Gypsy, Gypsy Wanderings cartridge, cut on my Cricut Expression, border punches and clear stamps for the greetings. I also used DCWV Rustic and Blossoms and Butterflies stacks and Bazzill Swiss Dots paper.


.


Hope you enjoyed todays feature! Have a great evening and thanks for stopping by.

Koala-t hugs,

Cathy
Wednesday, October 7, 2009

Using My Gypsy!

I've had my Gypsy for a week now and I LOVE IT! I get to create and not be tied to my computer all the time. I've designed while waiting for water to boil while making dinner and I've taken it to the laundromat. I designed these two cards within the 30 minutes, the time it took for my towels and sheets to wash. After i came home and had all the laundry put away, I plugged into the Cricut and cut! It makes designing so easy and quick!

I had experimented with various shapes to make sure the Gypsy was working and cutting well, but this card is my first official project! I used Gypsy Wanderings for the scalloped shapes to create the card and the greeting was also from Wanderings. THanks to Diane/Capedia from the Cricut Message Board for the inspiration!


The next two cards were designed while I waited at the laundromat. The first one I created, again using Gypsy Wanderings. Love the snowman and the marquee type shape. My first Christmas card using the Gypsy!


This card was created using Gypsy Wanderings and A Child's Year. I'm enjoying the framed cards and the images on A Child's Year are amazing! Another cartridge that I know I got more than my money's worth!


Little by little, I am learning all there is to know about the Gypsy and its gone very smoothly for me! I can't wait to show it off to my techie son. Thank you Provo Craft for a great crafting tool! I can't wait to see where we can go with the Gypsy!

Thanks for stopping by!

Koala-t hugs,

Cathy
Monday, October 5, 2009

Grunge Paper Roses - Tutorial

A couple weeks ago, I took a class at my local scrapbook store (Craft Fancy in Arlington Heights, IL) and learned how to make paper roses from grunge paper. I showed off my creations on the Cricut Message board and many asked how to make them, so I'm going to attempt to do a tutorial. I never considered myself a teacher, but with a Cricut class under my belt, and showing my mom a few things lately, maybe I can teach! If you read through these instructions, and something is not clear, or if you have any questions please contact me. There is a link to the left of this post where you can send me an e-mail. Here goes

First, let me tell you about Grunge paper. It is similar to the Tim Holtz Grungeboard, but it is thinner and has a smooth side and a very slight texture to the other side. It comes in 12 x 12 inch size and can be purchased on line. I purchased it at the local scrapbooking store.

Next, you'll need a template of a 5 petal flower. I had received a template from the class, but I found a great shape on the Cricut. I wanted to make different sizes so I looked through my Cricut shapes and found a 5 petal flower in the Plantin Schoolbook cartridge. But I had to use Design Studio to omit the opening in the center of the flower. (the shape is on page 76 with the Roly Poly Creative Feature selected and with Design Studio, deleting the inner circle). If you don't have Design Studio, there are punches available with a 5 petal flower.

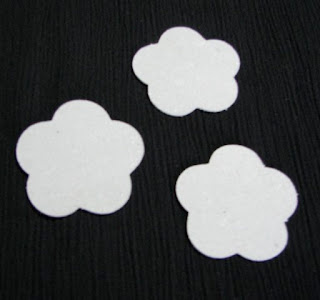
Step 1 Cut 3 flowers from grungepaper.


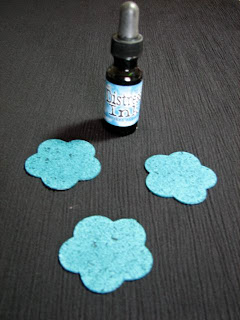
Step 2 Color the flowers. You can use acrylic paint, or alcohol inks but today, I used the reinker for the Tim Holtz China Blue Distress Ink. I used a makeup sponge and dabbed the ink on one side, let it dry to the touch and then inked the other side. Let it dry thoroughly, as it will take awhile to dry. Using alcohol ink will shorten the drying time. Acrylic paints dry pretty quickly also.

Step 3 With a pencil, place a small mark in the center of each flower for reference.


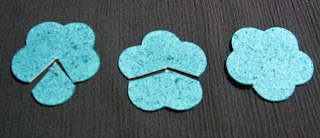
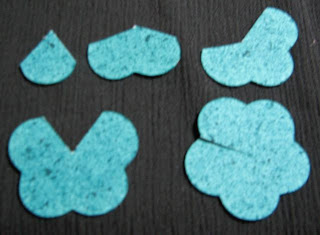
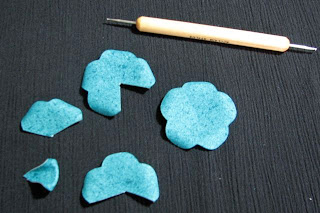
Step 4 - Make a cut in the first flower, cutting out one petal, using the pencil mark as point to cut to. With second flower, cut two petals out. In the third flower, make one cut to center point.

You will then have 5 pieces....one petal, two petals, three petals, 4 petals and 5 petals.

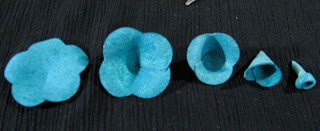
Step 5 - Curl the edges of the petals. In the class, we used a embossing tool to curve the petal edge of the piece around the metal part of the tool. If you don't have this tool, you can just roll the edges of the petal under. The TOP is the smooth side of the paper (the textured side will be the underside of the flower)

Step 6 - Gluing the edges. Starting with the smallest (1 petal) piece, roll it lengthwise, like a cone, with the points of the petal overlapping. I used a very small dab of gel superglue. It was the only adhesive I used that held. In the class we used glue dots, but I did not have luck with glue dots as the edges kept coming apart. I also tried Zip Dry, but the superglue gel (I used the gel as it did not drip all over) was the best hold. This is what the layers will look like when glued.

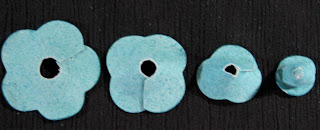
Step 7 - Using small tipped scissors, clip out small circles in the bottom of the layers 1 - 3. Make the holes gradually larger from small to large layer, so that each layer fits into the next layer.
Step 8 This shows how the layers will fit together. The picture on the right shows the one petal shape inside the two petal shape. Using Aileen's Paper Glaze, put a small amount on the bottom of the first two petals together, then add the next layer (three petal shape), fit them together, and repeat process with the remaining layers. Paper Glaze takes a long time to dry, so don't put too much. Apply just enough to go around the bottom of where the layers meet.
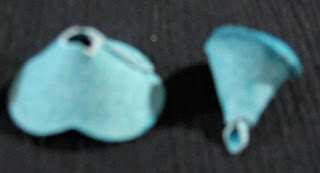
Once all glued together, this is what it should look like. (s0rry, the pics are a little fuzzy) You can leave the flower upside down to dry.

This is a picture of the finished product.


Here is a picture of several flowers I've made already. They are so much fun to make. I've made them with 1" flowers up to 2" flowers.


I hope you enjoyed this tutorial and if you are so inclined, please leave a comment!

Thanks for stopping by. Have a great week!

Koala-t hugs,

Cathy
Saturday, October 3, 2009

World CardMaking Day!

Today is World Cardmaking Day. To celebrate, I went to my local scrapbooking store and they were hosting a Make and Take. I made a lovely card for fall. I've gotten to know Simone and she is so much fun to hang out with. I've taken several classes from her and she is very talented.

Here is the card I made. I love the colors, some of my favorite.


Hope you had a great Saturday!

Koala-t hugs,

Cathy


Friday, October 2, 2009

Its October Already???

WOW, where did the summer go??? I can't believe its already October and its been a week since I posted! I've been BUSY, BUSY, BUSY! I've had lots of new "irons in the fire". I have been learning my new gadget, the Gypsy, making grunge paper roses and creating a new line of Koala cards! Each of which I will post an individual entry here. I will be working on a tutorial with photos on how to make the roses. I wish it could be a video, but I don't have a camera right now.

I'm anxious to show off my Koala cards too! I had so much fun creating them!

I'm also loving my new Gypsy! Yes, it has a learning curve, and this old(er) Dog loves technology but takes me a little while to get the hang of it. I've already created a few projects, but I'm taking it slow. I learn a little more each day!

Its Friday, so enjoy your weekend and stop by soon!

Koala-t hugs,

Cathy