Saturday, December 18, 2010

Shall We Dance Blog Hop!


Hi all! Today I am participating in my FIRST Blog Hop! I hope you arrived from Created By Missie's blog
http://createdbymissie.blogspot.com ( If you came to my site on your own, head on to Greengirl Scraps http://greengirlscraps.blogspot.com and start from the beginning!

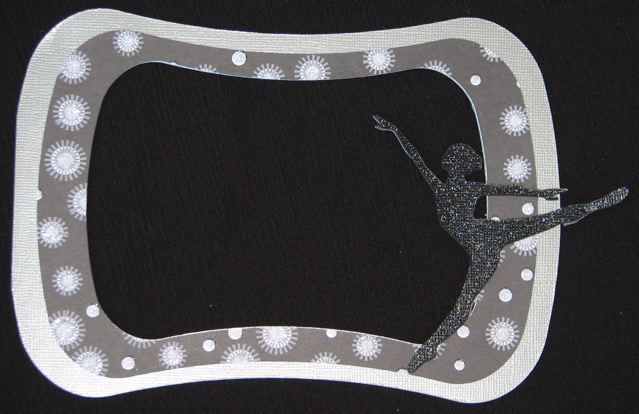
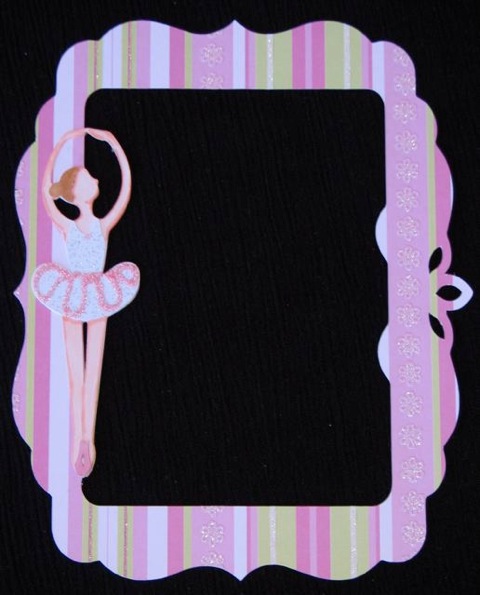
Here is my project for the bloghop. The photos are of my then 2 year old Granddaughter dressed for her first dance recital. She and her sister love dancing and I knew I would get lots of use out of this cartridge, scrapping all their dance shows.


Supplies used:

Bazzill Swiss Dots Cardstock
Bazzill Glazed Cardstock
Bazzill Bling Cardstock
Copic Markers
Shall We Dance Cricut Cartridge
Gypsy
Bling


Here is the list of all that are participating.


Thanks for stopping by and be sure to visit the next blog in the hop - Craftin' On My Door!

Have a great Saturday!

Koala-t hugs,

Cathy

Thursday, December 16, 2010

I've been MIA - Wore my OTHER HAT

Its been a month since I last posted. As I'm sure many of you agree, this is always a hectic time of year. I've had little time for papercrafting because for three weeks, I was sewing costumes for my granddaughters. They went to Disneyworld and had a special outfit for each day. I sewed 4 special costumes for each. They both got a Alice dress (Kayla's is more modern, similar to the recent movie and Kerri's was the traditional Disney type Alice.) I also made a Belle, Snow White and Princess Tianna (from Princess and the Frog). I sewed for Kayla a white and silver bride Cinderella gown, Jasmine outfit and a different style Princess Tianna. My daughter also had a Minnie and Tinkerbell outfit for each of them.

Here are a few photos of the girls in their "gowns" as Kerri called them.


Kerri being silly

Kayla in her Cinderella Bride dress

Kayla as Jasmine

Kayla and Kerri in their Alice dresses with White Rabbit

Kayla wearing Cinderella gown and Kerri wearing Sleeping Beauty after their day of beauty at the Bibbidi Bobbidi Boutique
I had hoped to give my sewing machine a little rest, but I do have a few Christmas gifts to finish. But I will be posting projects I've completed for gifts and an upcoming blog hop on Saturday.

Hope you are warm and cozy where you are, and may your holiday shopping be completed!

Koala-t hugs,

Cathy

Monday, November 15, 2010

Getting Into the Holiday Mood

Hi All!

Well, the craft fair is over and it went well. Saturday brought many holiday shoppers and it was nice to see the people crowding the aisles, searching for hand made gifts and decorations. Sunday was not quite as busy, but still a good crowd. It was nice to have my cases lighter in weight when I returned home. Katie and I spent the two days talking about our plan for 2011 and which shows we would like to do.

Now that the craft fair is history, I am in the Holiday spirt and even completed some gift shopping. I am shifting gears and for the next couple of weeks, I'll be sewing princess dresses for my 2 granddaughters. I will take breaks for papercrafting and posting here, but most of my time will be spent sewing.

So, before I move on to the sewing, I'd like to show some of the wall decor I created for the craft fair. The ones I made for Halloween and Thanksgiving went well, so I created more for the Christmas season.

This was the first one I created. I was inspired by the project in the Joy of the Season cartridge. I did mine a bit differently and used the two different versions of the wreath. Printed holiday paper is from Paper Studio (Hobby Lobby's brand) I used chipboard in the two layers of the background...plain circle and scalloped circle. Glitter paper is Core'dinations and JOY was cut using Opposites Attract Cricut cartridge. Ribbon was attached between the layers


I used Celebrate with Flourish Lite Cricut Cartridge for the wreath and the scalloped circle in the background with the eyelet border was cut from Lacy Labels, another Cricut Lite (I used this cartridge quite often with the background shapes for these wall decorations. Background paper is from 2009 DCWV Christmas stack, glitter paper is Core'dinations, greeting is from Winter Frolic and I used Stickles to outline the bow.

This is one of my favorites. I cut the shapes and the snowflake border on the top layer from Lacy Labels. When I saw this snowflake shape, I wanted to use it and I was thrilled to find a use for it finally! The church was cut using the Christmas Solutions Cricut cartridge. Blue paper with snowflakes is from Bazzill's glazed paper holiday like. Bottom layer (Gold with dots) is from DCWV Christmas stack. I used gold cord for the hangar.

Another wall decor using Lacy Labels for the two background layers and for the Santa and his sleigh against the moon was cut using Cricut Solutions cartridge. Glitter Paper from Core'dinations (this stuff is great! Glitter stays on the paper instead of getting everywhere when cut) Background paper is from K & Co 2009 Christmas stack. Greeting was cut using Winter Frolic.

For this one, I cut a basic oval using George Basic Shapes, used Gypsy Wanderings for the scalloped oval. For the animals, star and Baby Jesus, I used Winter Frolic. Background paper is DCWV Christmas stack (I believe it was from a few years ago!) Animals Baby and manger were cut from white paper and colored in with Copic Markers. Greeting cut also using Winter Frolic.

A similar one, but on a square shape background, with Baby and star only. Square shapes cut using Lacy Labels.


Another wreath wall decor. Used Joys of the Season for the wreaths, background shape from Lacy Labels, printed paper from Paper Studio Holiday stack and Joy cut using Opposites Attract.

A few years ago, I saw a rubber stamp that had the word JOY spelled out with shapes and that inspired me to create this panel. Stocking and candy canes from Christmas Cheer, wreath from Joys of the Season, background shapes from Lacy Labels. Shapes were cut using the Imagine, enhanced with Stickles. Background paper from Paper Studio Christmas Stack.

I think this was my favorite of all of them! The Window shape and tree were cut using Christmas Solutions cartridge, fire place cut using Christmas Cheer and piano was from A Child's Year cartridge. Background shapes cut from Lacy Labels.

This last one was created using Christmas Cheer for the Gingerbread house, the Gingerbread man was cut from My Community. Paper is from Bazzill (darker blue with glazed snowflakes) Light blue with snowflakes is from DCWV Holiday Stack. I used Stickles for some of the candies at the front of the house and a little bling for the "wind" swirls. Greeting cut using Winter Frolic.

Hope you enjoyed today's features! I enjoyed creating these panels and they were a big hit at the craft fair.

Thanks for stopping by and have a great day!

Koala- t hugs,

Cathy

Wednesday, November 10, 2010

Projects Created with my Imagine

Hi All!

Wow, two posts from me in one day!

I was so excited that I created these using my Imagine. I had hit a few snags when using the freezer paper method (see previous post), the paper didn't stick down in places and the paint seeped through. Fortunately I was able to fix the boo boos. I decided to try something else and was thrilled with the results.

I purchased a package of the Avery Ink Jet Iron On transfer paper. This was for white or light colored fabrics. With this version, I had to reverse my image before printing. I used the blue print from the Imagine cartridge Yummy. The words "Tiny Dancer" are from the Cricut Cartridge Once Upon a Princess. The dancer girl is from Shall We Dance , but still had to use the freezer paper method (the Mac version of the Cricut Sync software is not available yet, so I was not able to use Shall We Dance in my Imagine yet....fingers crossed it will be out next week!).


This next bag was made using two different types of the iron on transfer paper. For the first layer which is the crown and word "princess" shape from the Once Upon a Princess cartridge. I used the Avery ink jet iron on transfer paper. I had to reverse the image with this also. I ironed it and it transferred well. For the second color for the crown, I used a transfer paper that is for dark fabrics. This was made by Wilton (yep, the Cake decorating folks!) and I LOVE this stuff! I didn't have to reverse the image, printed and cut it in the imagine and all I had to do was peel off the paper backing and place it on the fabric and iron on! I had to line it up so it covered the purple of the first layer, but if you look carefully, it does have a nice purple outline around the pink crown. I was very happy with the way this turned out! This is one of the bags I sewed myself.


These next two bags I used the Imagine and the Wilton transfer paper for dark fabrics. Made it SOOO EASY! I sewed these bags too.

These words were cut using the Hanna Montana cartridge. The print used on the word ROCK is from the Yummy Imagine cartridge.


The corners from this were cut using the Yummy Imagine cartridge and the word Imagine is from Home Accents and color print is from Yummy Imagine Cartridge. For some reason, it photographed more yellow, but it has more green and pink and some blue in the print too.

Thanks for stopping by! Wish me luck for the craft fair....AND that I survive the weekend (its a lot of work sitting around waiting for sales!)

Have a great day!

Koala-t hugs,

Cathy

Latest Projects

Katie and I have our 2 day craft fair coming up and I've been busy! Here's a quick post to show the totes I've made for the craft fair.

These were made using the freezer paper method and craft paint. The white and pink bag I purchased from Hobby Lobby, but the blue denim ones I actually made myself. I knew there was a reason I kept that denim in my ever dwindling stash of fabric! I used my Cricut Expression and the cartridge Wall Decor and More for the dancers on the first bag and the single dancer on the last one is also from Wall Decor and More cartridge.

For the second and third bags, I used Shall we Dance cartridge. I just received this cartridge about a week ago. This is a Cricut Circle exclusive cartridge and ever since seeing the graphics, I knew I wanted to make something using the ballet shoes and dancers on this cartridge.


I have a few more bags to show, but will create another post as I used another method to create the graphics!

Thanks for stopping by. I'm looking forward to getting this show over with. Once it is done, I will be able to post all the other projects I've created!

Koala-t hugs,

Cathy

Thursday, November 4, 2010

Latest Circle Cartridge - Shall We Dance


Hi all! Its been so hectic lately, I have sorely neglected my blog! Halloween costumes to sew, birthday celebrations and preparing for the upcoming craft fair has all kept me very busy.

I thought I'd do a quick post today, showing a new project made with the latest Circle Exclusive cartridge - Shall We Dance. With 2 granddaughters in dance, this cartridge will be used quite often!

I had this idea before ever receiving the cartridge and hope to make a few of them for the upcoming craft fair (Harper College - November 13 and 14 for anyone in the Chicago area)

I used the freezer paper method to create templates to paint the ballet shoes on this tote bag. It was a bit tricky because I used 2 colors, but it turned out pretty well.

I cut the base image at 9" and also cut out the layer to paint the dark pink. Great for that little girl starting out in Dance.

Well, its back to work! Have a great day everyone. It always seems to amaze me how quickly the year passes, especially this time of year. Halloween is over and Thanksgiving is 3 weeks away!

Have a great day everyone! Thanks for stopping by!

Koala-t hugs,

Cathy

Wednesday, October 20, 2010

Cards Made with the Imagine

Here are a few cards I've made using the Imagine.

The first one I used the cartridge called Yummy. And Yummy it is, with all the food and celebratory images. I love the colors on this cartridge and the prints. The flourishes that are imprinted on many of the images are my favorites. And I like the color combos of pink and brown and blue and brown...this is a must have!


This next card, I used Yummy to create the flourishes and the background print. Happy birthday was printed and cut using Create a Critter and I used Stickles to color it in. The bottom layer was an experiment. I have a stack of white on white paper by SEI. I wanted to see how it would come out after being printed. I used a blue print from the Yummy cartridge and used a Q-tip to remove the ink from the glossy flowers. Its difficult to see the actual image, the light just shows the glossy flowers embossed in the paper. On another day, I will post, showing the different papers used in the Imagine.


I'm slowly getting accustomed to using the Imagine. Its pretty nifty. It will be even NIFTIER (if that is a word tee hee) when I can choose color and designs, print and cut, using the Gypsy.

I think I will only be limited by my IMAGINation! =~D

Have a great day!

Koala-t hugs,

Cathy

Tuesday, October 19, 2010

My IMAGINE IS HERE!


Things have been quite hectic around here the past few weeks. In between making Pink Lady costumes for my granddaughters and making items for the craft fair in November, my Imagine arrived! I had an idea I would be receiving it, just didn't know what day. It arrived the day my daughter and granddaughters were visiting and Kayla was almost as excited about it as I was!


I knew I had to concentrate on setting it up but Kayla was so excited for me, I unpacked it with her. She chattered on about how cool it was as we took the cords and ink and packing materials out of the box. I lifted the Imagine out of the box (and this baby is HEAVY!) and put it on the table...the space I had designated weeks earlier where I would put the Imagine. Kayla looked at it for a moment and said "can we do something with it?". I told her about all the "technical stuff" I had to do before getting it to work, but promised the next time she came over, we would make something together.


That evening, after the girls went home and I had dinner, I sat down and read through all the instructions and got my Imagine up and running. I was a bit apprehensive after reading of the problems some were having with their Imagine, but I forged ahead. Fortunately, all went well and I was printing and cutting in no time.


This is the first project I made, using Nursery Tails (a cartridge I had ordered and received before my Imagine even arrived!) The colors are bright and the graphics sharp. It took a bit to calibrate it , so the images were cut out correctly. But with the help of all the information that had been posted on the various message boards, I was able to get accurate cuts.
I have been using the Imagine, in between finishing my sewing projects. It is an AWESOME crafting tool! In the coming weeks, the Imagine will be made compatible with the Gypsy and I will be able to create my projects on the Gypsy and print and cut them on the Imagine. I see lots of potential with the Imagine. I am very fortunate that I won this "COOL TOY"!

In the coming weeks I will feature projects created with the Imagine. Hope you come by and see what I come up with!

Have a great day!

Koala-t hugs,

Cathy

Monday, October 4, 2010

Celebrate Dancers

Hi all! Hope you had a great weekend. The craft fair on Saturday went well. Its always good when we make more than what we paid for the show entry fee! Katie and I had a nice day and came up with ideas for the next show in November. I wasn't feeling great, was fighting a cold (its starting to go away) but I managed to get through the day and feel good about the results.

Today, I'm featuring a few more magnet frames I created. I did get lots of positive comments on the magnet frames, but didn't sell any.

These three are all dance themed.

The first two, I used one of the frames from Lacy Labels and the dancer is from Wall Decor and More.

I used DCWV Silver cardstock and the black and silver from All Dressed Up. Dancer shape was cut using glitter cardstock from Core'dinations.


This one I used Cindy Loo for the frame shape. The ballerina is from Joy of the Seasons and paper is DCWV.

I'm taking a little break from creating to do a little sewing, but will be returning to papercrafting to prepare for the November craft fair. This is a 2 day event and I want to be prepared!

Have a great day!

Thanks for stopping by.

Koala-t hugs,

Cathy

Friday, October 1, 2010

Shape book for that Furry Family Friend

Happy October everyone! Hoping you are enjoying autumn where ever you may be!

Here's one last post before the weekend and the Craft fair! I've got everything packed up, made new name tags for my daughter and I, even a new sign.

Paper Pups was one of the first cartridges I bought in 2006 shortly after the Cricut came out. I used it quite a bit then, but realized I had not used it in a very long time. I decided to make a shape book for the craft fair.

I used my Gypsy to weld a rectangle to the dog shape from Paper pups. I cut the shape from chipboard, and two layers of cardstock to cover the chipboard.
Here is the finished product.


I cut the terrier and highlighted it with copic markers.


Best Friends was cut using Paper Pups. WOOF cut using Pooh Font . Corners are cut using Picturesque.


The pup and the paw prints on this page were also cut from Paper Pups, fire hydrant was cut from Paper Dolls Dress up.


Thanks for stopping by. Wish me luck for the craft fair! Its at Schaumburg High School in Schaumburg, Illinois. Its on a well traveled street, well advertised and I've heard great things about this particular craft fair. I'll give a full report when its over.

Have a great Friday!

Koala-t hugs,

Cathy

Wednesday, September 29, 2010

More Items for Craft Fair

Its been a busy week, getting everything together for the Craft fair on Saturday. I made more magnet frames and here are some Halloween themed frames.

All frames were cut with the opening to hold a 4 x 6 photo - the frames measure 5 3/4" high by 7 3/4" approximately. I purchased the adhesive backed magnet sheets from Hobby Lobby. The sheet is 12 x 24" and I was able to cut 6 - 6 x 8" sheets from it. I applied the cardstock to the magnet sheet before cutting and when I cut it, I set the multi cut on my Gypsy to 3.

This first frame was made with Happy Hauntings. I LOVE this cartridge. It has lots of great Halloween themed images, including some great frames. This has the four skulls on the corners, and I added a bat, a pumpkin and BOO.


I used Lacy Labels for the shape for this one, using my Gypsy to weld two sizes to make the frame and the bat and pumpkin are also from Happy Hauntings.

This one is another frame from Happy Hauntings, made with DCWV Halloween paper stack.

This last one, the frame was cut using Lacy labels and the Images from Happy Hauntings.


Tomorrow I'll post more frames, different themes.

Thanks for stopping by. Hope you are enjoying the final days of September!

Koala-t hugs,

Cathy

Saturday, September 25, 2010

Lee DeWyze Concert WOW!


Last week, my friend Marie called and asked if I would like to go with her to see Lee DeWyze. He would be performing at Arlington Park Racetrack (Arlington Heights, IL) and I said YES! I hadn't been watching much of Idol over the past few years, but when I heard they had a contestant from the town where I lived, I had to check it out. He received a great deal of support from Mount Prospect and the surrounding suburbs and we are very proud of our American Idol winner! And now, I was going to have the chance to see him in concert!

It was held in the grandstands at the racetrack and the weather was a bit cool to be outdoors, and we were in the last row at the top, but none of that mattered once he appeared on stage. He sang some songs I didn't recognize, a few I did (The Boxer, Hallelujah, Rocket Man). He did one song, I think was called "Dreaming" and he said that was the first time performing that song. I can't wait until his new CD is released in October.

Here are a few photos of the concert.

Thanks for letting me share my excitement!

Koala-t hugs,

Cathy


Friday, September 24, 2010

Halloween Wall Hangings

Today, I'm posting three more projects similar to the ones I posted Tuesday. These are Halloween themed. I really like the Happy Hauntings cartridge. Lots of fun Halloween phrases and shapes. And the layers of the shapes give more dimension to the shapes.

The base shape was cut using Lacy labels, using one layer of chipboard and cardstock (DCWV Halloween Stack and EK Success Halloween paper) to cover the front and back of the chipboard. All Halloween shapes were cut using Happy Hauntings.


Its a bit difficult to see in the photo, but I used Core'dinations glitter paper for the letters and the cat.


This one is cut the same way, except the BOO was cut using Wild Cards cartridge.


And the last one...another variation.


I've made a total of 8 of these wall hangings for the craft fair. If they sell, I'll make a few for the next show in November, but with a Christmas/winter theme.

Thank you for stopping by! Have a great day.

Koala-t hugs,

Cathy