Thursday, December 24, 2009

Holiday WIshes to all!

I want to wish you all a very Merry Christmas. May your lives be filled with joy, love and good health now and throughout 2010.

Thank you to all that have followed my blog during 2009 and I hope 2010 will be filled with an abundance of creativity for me to share with you all!

Happy Holidays
Merry Christmas


Koala-t hugs,

Cathy

Sunday, December 20, 2009

Christmas Is ALMOST HERE!


Its only 4 more days until Christmas! The month flew by! I hope you are all ready for the big day! For a nice change, I am a head of schedule.

I wanted to post this project that I created a few weeks ago. I had always had an angel for the top of my tree. For many years, I had an angel doll that I made, but since getting a smaller tree, the doll was too heavy and made the branch tip forward.

Since getting the Christmas Solutions cartridge, I have been finding many different and fun cuts on it. I thought I would give the angel a try, making it in a larger size for my tree.

I cut it at 9", cut the blackout two times, and the overlay twice. Also, I cut the wings twice.

I punched small holes in the edge of the angel's skirt and hand stitched with gold thread. I glued the layers together, leaving the bottom open, glueing only on the outer edges of the skirt, so I had a place to insert the top branch of the tree.

I used gold Stickles on the wings and diamond on the collar and the sleeves.

It looks great on the tree!

Hope where ever you are, you are warm and cozy!

Koala-t hugs,

Cathy

Sunday, December 6, 2009

Happy Birthday Dylan!


It has been some time since I have posted. It seemed as if my creativity decided to take a vacation of some sorts. It seemed to coincide with my re-arranging of my crafting space. Ever since I moved things around, I have had a tough time being creative. With my nephew's birthday party approaching, I finally was able to create!

I made these cards for Dylan's 7th birthday...one from me and one for my mom to give him.

At the young age of 6, Dylan has become quite the photographer, and has his photos chosen for a local School district creativity contest! One photo was of a lion and with that in mind, I created this card for Dylan.

I used the lion from Cricut Cartridge Everyday Paper Dolls, I used the Gypsy to weld the lion to a rectangle and create a shaped card. Color accents were added using Copic Markers.


This next card was also created using the Gypsy. Martian and space ship were cut using Everyday Paper dolls, planet was hand cut and inked. Inside of card reads "Hope your birthday is out of this world!"


I'm hoping these cards and the photo book (that I'll post tomorrow) has helped to get my creativity back on track. I'm hoping I won't have to put my workspace back to where it was and my old creative juices will begin to flow once again!

Thanks for stopping by....have a great Sunday!

Koala-t hugs,

Cathy T


Thursday, November 26, 2009

Happy Thanksgiving!

Wishing you all a very Happy Thanksgiving. Have a wonderful day!

Koala-t hugs,

Cathy

Wednesday, November 25, 2009

Away in a Manger

Here is another Joy Fold card, but this one is a 7 x 5 size. I wanted to do something with the manger from Paper Dolls. I cut out the stable three times and cut out the outline of it and glued it to the base to give it a bit more depth. The manger and star were also cut 3 times and glued to give depth to the shapes. I cut out the baby from Paper Dolls but had to alter it a bit to give it a silhouette look. A circle was cut for the halo.

Paper for the card is the DCWV Christmas Holiday Collection. (LOVE this paper). Circles cut using Gypsy Wanderings and embossed greeting from Just Rite Christmas stamp set.


Thanks for stopping by.

Koala-t hugs,

Cathy

Monday, November 23, 2009

Happy Birthday David!

Its been a busy weekend! Saturday, we celebrated my son's 29th birthday. I made dinner for my son and his wife (they are expecting twins next March) and for my daughter, her husband and my two granddaughters. My granddaughters stayed the night and all day today, they kept me very busy! It was an unseasonably warm and beautiful November Sunday, so we were able to go to the park.

Now that they are asleep, I want to post this card that I made for my son's birthday. His actual birthday is November 22. I've always been proud of my son, but recently there's been some excitement about a project he's been working on. The game Tony Hawk's RIDE was released last Tuesday. My son was one of the programmers for this game. He also created, the controller for the game which is a wheelless skateboard with electronic sensors in it. So, with this in mind, I created this card.

I used Everyday Paper dolls Cricut cartridge to create the controller and the skater, to look like my son. The large screen TV was hand cut. I used Wild Cards Cartridge for the Happy Birthday greeting, and Pooh Font for his name.

The inside was cut using Jasmine shadow feature for "enjoy the" and RIDE was cut using Pooh Font.


Hope you had a great day, David! And I hope the game is a BIG success!

Thanks for stopping by.

Koala-t hugs,

Cathy

Wednesday, November 18, 2009

Santa and his Sleigh

One of the reasons I wanted to get the Christmas Solutions Cricut cartridge was for this particular shape.

The background is Bazzill Glazed Christmas paper, moon and Santa and his sleigh were cut at 3" using the Christmas Solutions cartridge. EK Success scallop border punch and acrylic stamp for greeting.

Thanks for stopping by.

Koala-t hugs,

Cathy

Tuesday, November 17, 2009

My First Joy Fold Card

I've been seeing examples of Joy fold cards for some time, but never wanted to make one. Until recently, I saw the ladies at Christmas with the Cricut make a video and a Christmas themed Joy Fold card. I thought I'd give it a try. I'm SO glad I did, as they are lots of fun to make!

For this card, I used Bazzill Glazed Christmas paper (the green with holly leaves), DCWV Holiday Collection paper (print), reindeer was cut using the Gypsy Wanderings cartridge, with a bit of Stickles on the antlers. Scalloped circles were also cut using Gypsy Wanderings. Greeting is from Just Rite A Merry Little Christmas stamp set.

I so enjoyed making this card and will be making many more!

Thanks for stopping by....

Koala-t hugs,

Cathy

Sunday, November 15, 2009

Happy Birthday Ryne!

We celebrated my great nephew's birthday yesterday. Ryne is a big sports fan (much like his Dad) and has been recently accumulating Chicago Black Hawks autographs. They are also big Disney fans, so I wanted to make a personalized card for him and came up with this theme.

I have to give credit to Mayflower (her screen name on the Cricut Messageboard) as she posted a video instruction as to how to make "tunnel" cards. I liked the style and started with that. I cut out Mickey and his uniform and I then realized Mickey wouldn't fit inside the card. I had to change the layout of the card...and this is what I came up with.

I started with a base of white cardstock, cut 14 x 5. I scored it at the 7" mark and folded. I used the Blackhawk colors - red, black and white. The title was cut using Don Juan for "the" and "is" and Hello Kitty Font for "Goal". THe hockey sticks were cut using Everyday Paper Dolls. The upper corner was a little bare, so I created a stripe with black and white cardstock, and printed the Blackhawks logo from the image I found on the internet (gotta love the internet!)


The inside card was created using more white cardstock, also cut at 14 x 5, scored for the tunnel card (at 3 1/2", 7" and 10 1/2"). Strips of black and red cardstock were cut for the side panels. Used Hello kitty Font for "to wish you" and Zoobaloo for Happy Birthday.

BlackHawks Mickey was created using Mickey and Friends Mickey cut at 4 3/4", and the hockey uniform and gloves and skates and stick were cut using Everyday Paperdolls, and using the Gypsy, stretched the images to make them wider to fit Mickey. Used white pen to create the laces on the skates, and the white bands on the uniform. Used a silver Sharpie to color the skate blades. The net was also cut using Everyday Paperdolls. (you can click on the photo to get a bigger view).

This card was lots of fun to make, but took quite a bit of time. I think because it was the first time I made this style. I hope to make more in the future now that I know how they work!

Thanks for stopping by! I hope you enjoyed today's feature. Enjoy the rest of your Sunday and hope you stop by again soon!

Koala-t hugs,

Cathy

Friday, November 13, 2009

Snowflakes

Today's feature is a card made from "leftovers". I had cut a set of snowflakes and when I saw what was left on the mat, I thought it would make a nice card. I matted it with white and green. Background paper is from DCWV Christmas Glitter stack (2007) and the bottom dark green cardstock is embossed with the snowflake Cuttlebug folder. The greeting is from Just Rite Stamp set, colored in with Copics. I also used the Spica glitter pen on the bells to give it a bit of BLING. The scalloped ovals were cut using Gypsy Wanderings.


I hope you like today's feature. My cards tend to be more simple, but I guess I prefer that style more. I'm always worried I'd over do it, so I keep them simple.

Thanks for stopping by! Have a great weekend.

Koala-t hugs,

Cathy

Thursday, November 12, 2009

Peace and Joy

Today features 2 different cards. The first one I've wanted to make ever since I saw this stylized tree on the Christmas Solutions cartridge. Its so simple and elegant! I finally got this cartridge last week and have been using it often!

I cut the tree at 5" with gold paper as the shadow. The background paper is from the DCWV Christmas stack 2008, this is one of my favorite styles from this stack. I used one of my border punches to do the cut out on the corners. The greeting is a clear stamp and I cut two scalloped ovals using Gypsy Wanderings.


The next card is also very simple. The red mat was cut using A Child's Year - this cartridge has a wide variety of cards and mats for the cards. The wreath was cut using Christmas solutions. Scalloped ovals cut using Gypsy Wanderings...this digital cartridge has a great selection of shapes! I've been using them often! Greeting is stamped. Gold bow added to finish!

Thanks for stopping by. Hope you enjoyed your visit!

Koala-t hugs,

Cathy

Wednesday, November 11, 2009

The card in today's spotlight I used several different tools to create. The background paper is Whitewash by Core'dinations, embossed with the snowflakes Cuttlebug folder, sanded lightly for the color to come through. The border at the bottom edge was created using EK Success swirl border punch (LOVE this punch!) The large snowflake was cut from pearlized paper, using the Gypsy and the snowflake is from the Gypsy Wanderings cartridge. The greeting is from the Just Rite Merry Little Christmas stamp set. I really love the verse "Snowflakes are winter's butterflies". The scalloped circle was cut from Gypsy Wanderings. Its a fairly simple card, but I'm pleased with the way it turned out.

Hope you enjoyed today's feature. There are many more cards to post! Come back again to see more!

Thanks for stopping by!

Koala-t hugs,

Cathy

Monday, November 9, 2009

Gypsy Snowman

This is one of the first cards I created using my Gypsy. Card is 5 x 7 in size. Cut at 5" this fun little snowman is one of the characters on the Gypsy Wanderings character that came preinstalled on the Gypsy. Background paper is from the DCWV Christmas Stack 2008.

Thanks for stopping by...

Koala-t hugs,

Cathy

Sunday, November 8, 2009

Busy Making Christmas Cards

For the past few weeks I've been having fun making Christmas cards. I've been giving my Gypsy a work out! I'll be posting a few every week from now until Christmas...which is about 5 weeks away!

The first one is made using the Martha Stewart Deep Punch called Vines. I think this punch is really pretty! I recently purchased two sets of JustRite stamps and they are great! I don't do much stamping, but like them for greetings or little accents to add to a card. The stamp I used is from the Christmas Joy set. I colored in the design with Copics and layered the oval with two scalloped ovals. The printed cardstock is from DCWV 2008 Christmas Stack.


Thanks for stopping by....I'll be doing a better job at keeping my posts up to date!

Koala-t hugs,

Cathy

Wednesday, October 28, 2009

Its Almost the Witching Hour


Halloween is right around the corner. The past two days, I worked on my 4 year old granddaughter's costume. She is going to be Minnie Mouse - with the costume she wears in the Mickey Mouse Playhouse show. A few weeks ago, when we went looking for fabrics, Kayla was still undecided as to what she wanted to wear...we looked at patterns and fabrics. We nearly settled for Dorothy from The Wizard of Oz, and for some reason, she said she wanted to be Minnie. We looked for red polka dots (or as Kayla corrected me - red with white polka dots). We didn't find the big dots, but then she suggested pink and Kayla spotted the bolt of fabric with the big white dots on a very pretty pink background. She tried on the costume today and danced around for nearly an hour. But the best part was when she gave me a big hug and thanked me for making the costume! I will be sure to get photos of her on Saturday with her ears and "shiny shoes" and all and post it here for all to see.

I had this idea in my head when I wanted to make a Halloween card. I created this using my Gypsy, using the Gypsy Wanderings and A Child's Year cartridges. (and George for the Moon)

Thanks for stopping by....

Koala-t hugs,

Cathy

Sunday, October 25, 2009

Fall Colors


I'm not sure, but it seems a sure sign of "age" is when a person says "where did the time go?" In my case, maybe its because of my upcoming birthday, or its just the time since I last posted seemed to fly by! In any event, October is nearly over and I"m trying to figure out what kept me so busy!

Every year, I see how beautiful the leaves are as they turn their autumnal colors, and I say "I need to get out and get some photos of these beautiful colors" but I never get around to it. Well, this year I DID! It was a beautiful fall day, I grabbed my camera and drove around the neighborhood snapping pictures.

This one was taken behind my apartment building. I love the contrast in colors between the two trees and how they look against the brilliant blue of the Sky. Fall colors, earth tones, are some of my favorite colors. Nature's artwork always leaves me awestruck.

Please enjoy the photo and I hope you are enjoying Autumn colors where ever you are! I'll be back very soon to post more projects I've accomplished in recent days!

Enjoy the rest of the weekend....and have a great week!

Koala-t hugs,

Cathy

Friday, October 9, 2009

Koala-t Kreations Cards

Anyone who knows me, knows how much I love koalas! I have them all over my apartment in various shapes and sizes. Figurines, stuffed toys, paintings, clocks, artwork, books, the list is endless.

I've been wanting to bring my love of koalas into a line of greeting cards, I made a group of sketches from the books and photos I've collected over the year. Many of the sketches I made were created using photos my daughter, Katie, took when she visited the San Diego zoo's koala park.

Here is the first group of cards I created. The supplies I used:
Copics to color the Koalas, 2 different leafy designs of Cuttlebug embossing folders, Core'dinations White wash,and Neutrals paper. scalloped circles created using the Gypsy, Gypsy Wanderings cartridge, cut on my Cricut Expression, border punches and clear stamps for the greetings. I also used DCWV Rustic and Blossoms and Butterflies stacks and Bazzill Swiss Dots paper.


.


Hope you enjoyed todays feature! Have a great evening and thanks for stopping by.

Koala-t hugs,

Cathy

Wednesday, October 7, 2009

Using My Gypsy!

I've had my Gypsy for a week now and I LOVE IT! I get to create and not be tied to my computer all the time. I've designed while waiting for water to boil while making dinner and I've taken it to the laundromat. I designed these two cards within the 30 minutes, the time it took for my towels and sheets to wash. After i came home and had all the laundry put away, I plugged into the Cricut and cut! It makes designing so easy and quick!

I had experimented with various shapes to make sure the Gypsy was working and cutting well, but this card is my first official project! I used Gypsy Wanderings for the scalloped shapes to create the card and the greeting was also from Wanderings. THanks to Diane/Capedia from the Cricut Message Board for the inspiration!


The next two cards were designed while I waited at the laundromat. The first one I created, again using Gypsy Wanderings. Love the snowman and the marquee type shape. My first Christmas card using the Gypsy!


This card was created using Gypsy Wanderings and A Child's Year. I'm enjoying the framed cards and the images on A Child's Year are amazing! Another cartridge that I know I got more than my money's worth!


Little by little, I am learning all there is to know about the Gypsy and its gone very smoothly for me! I can't wait to show it off to my techie son. Thank you Provo Craft for a great crafting tool! I can't wait to see where we can go with the Gypsy!

Thanks for stopping by!

Koala-t hugs,

Cathy

Monday, October 5, 2009

Grunge Paper Roses - Tutorial

A couple weeks ago, I took a class at my local scrapbook store (Craft Fancy in Arlington Heights, IL) and learned how to make paper roses from grunge paper. I showed off my creations on the Cricut Message board and many asked how to make them, so I'm going to attempt to do a tutorial. I never considered myself a teacher, but with a Cricut class under my belt, and showing my mom a few things lately, maybe I can teach! If you read through these instructions, and something is not clear, or if you have any questions please contact me. There is a link to the left of this post where you can send me an e-mail. Here goes

First, let me tell you about Grunge paper. It is similar to the Tim Holtz Grungeboard, but it is thinner and has a smooth side and a very slight texture to the other side. It comes in 12 x 12 inch size and can be purchased on line. I purchased it at the local scrapbooking store.

Next, you'll need a template of a 5 petal flower. I had received a template from the class, but I found a great shape on the Cricut. I wanted to make different sizes so I looked through my Cricut shapes and found a 5 petal flower in the Plantin Schoolbook cartridge. But I had to use Design Studio to omit the opening in the center of the flower. (the shape is on page 76 with the Roly Poly Creative Feature selected and with Design Studio, deleting the inner circle). If you don't have Design Studio, there are punches available with a 5 petal flower.

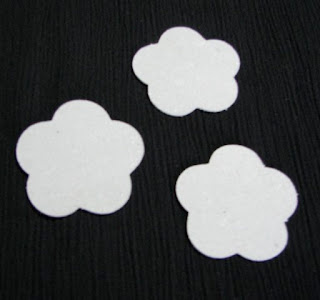
Step 1 Cut 3 flowers from grungepaper.


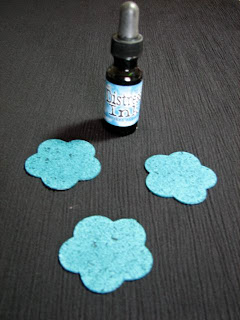
Step 2 Color the flowers. You can use acrylic paint, or alcohol inks but today, I used the reinker for the Tim Holtz China Blue Distress Ink. I used a makeup sponge and dabbed the ink on one side, let it dry to the touch and then inked the other side. Let it dry thoroughly, as it will take awhile to dry. Using alcohol ink will shorten the drying time. Acrylic paints dry pretty quickly also.

Step 3 With a pencil, place a small mark in the center of each flower for reference.


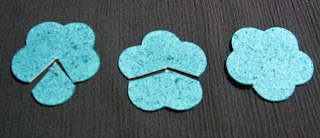
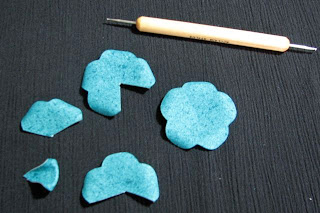
Step 4 - Make a cut in the first flower, cutting out one petal, using the pencil mark as point to cut to. With second flower, cut two petals out. In the third flower, make one cut to center point.

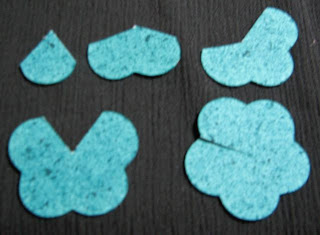
You will then have 5 pieces....one petal, two petals, three petals, 4 petals and 5 petals.

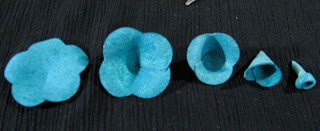
Step 5 - Curl the edges of the petals. In the class, we used a embossing tool to curve the petal edge of the piece around the metal part of the tool. If you don't have this tool, you can just roll the edges of the petal under. The TOP is the smooth side of the paper (the textured side will be the underside of the flower)

Step 6 - Gluing the edges. Starting with the smallest (1 petal) piece, roll it lengthwise, like a cone, with the points of the petal overlapping. I used a very small dab of gel superglue. It was the only adhesive I used that held. In the class we used glue dots, but I did not have luck with glue dots as the edges kept coming apart. I also tried Zip Dry, but the superglue gel (I used the gel as it did not drip all over) was the best hold. This is what the layers will look like when glued.

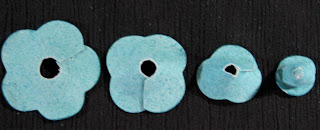
Step 7 - Using small tipped scissors, clip out small circles in the bottom of the layers 1 - 3. Make the holes gradually larger from small to large layer, so that each layer fits into the next layer.
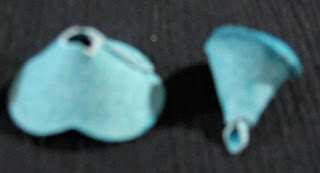
Step 8 This shows how the layers will fit together. The picture on the right shows the one petal shape inside the two petal shape. Using Aileen's Paper Glaze, put a small amount on the bottom of the first two petals together, then add the next layer (three petal shape), fit them together, and repeat process with the remaining layers. Paper Glaze takes a long time to dry, so don't put too much. Apply just enough to go around the bottom of where the layers meet.
Once all glued together, this is what it should look like. (s0rry, the pics are a little fuzzy) You can leave the flower upside down to dry.

This is a picture of the finished product.


Here is a picture of several flowers I've made already. They are so much fun to make. I've made them with 1" flowers up to 2" flowers.


I hope you enjoyed this tutorial and if you are so inclined, please leave a comment!

Thanks for stopping by. Have a great week!

Koala-t hugs,

Cathy

Saturday, October 3, 2009

World CardMaking Day!

Today is World Cardmaking Day. To celebrate, I went to my local scrapbooking store and they were hosting a Make and Take. I made a lovely card for fall. I've gotten to know Simone and she is so much fun to hang out with. I've taken several classes from her and she is very talented.

Here is the card I made. I love the colors, some of my favorite.


Hope you had a great Saturday!

Koala-t hugs,

Cathy


Friday, October 2, 2009

Its October Already???

WOW, where did the summer go??? I can't believe its already October and its been a week since I posted! I've been BUSY, BUSY, BUSY! I've had lots of new "irons in the fire". I have been learning my new gadget, the Gypsy, making grunge paper roses and creating a new line of Koala cards! Each of which I will post an individual entry here. I will be working on a tutorial with photos on how to make the roses. I wish it could be a video, but I don't have a camera right now.

I'm anxious to show off my Koala cards too! I had so much fun creating them!

I'm also loving my new Gypsy! Yes, it has a learning curve, and this old(er) Dog loves technology but takes me a little while to get the hang of it. I've already created a few projects, but I'm taking it slow. I learn a little more each day!

Its Friday, so enjoy your weekend and stop by soon!

Koala-t hugs,

Cathy

Friday, September 25, 2009

Lyrical Letters and Christmas

I created these cards using the Lacy Christmas tree that is on the Lyrical Letters Cricut Cartridge. I've wanted to use this shape since I got the cartridge during the summer, but wasn't quite sure how I wanted to do them. I just started cutting shapes and came up with several different cards using the tree shape. Here are a few...

This one I cut the tree from medium green cardstock, and cut by hand, the background (this shape does not have a black out feature on the cartridge). I cut the red frame using Accent Essentials and embossed it in the Cuttlebug, using the Swiss Dots embossing folder. Background paper is from the 2008 DCWV Christmas Stack.


This one is a bit simpler, using two different sized tree shapes, cut from red and green cardstock. The border was created using EK Success Slim Line Border punch, background paper is Coredinations paper from the Chocolate Box collection, embossed with Sizzix embossing folder.
Another version using the lacy tree, this one I used Design Studio to weld the tree shape to the marquee shape frame, cut another marquee shape from the DCWV Christmas glitter paper, and the card was also created using the Marquee shape. I added a little bling and stickles to brighten it up.

Thanks for stopping by. Hope you enjoyed your visit and please leave a comment if you are so inclined!

Koala-t hugs,

Cathy

Thursday, September 24, 2009

Using A Child's Year for Christmas Cards

I recently was able to get the cartridge A Child's Year for a great price. It has lots of great shapes and even a font on it. I was in the mood for Christmas cards recently and created these and a few more.

Anything with Santa and children is perfect for Christmas...and together they make a great card! I used DCWV Christmas stack from 2008 for the background paper, EK Success border punch, a few bling in the upper corner and Stickles for the gift.


This is another great shape. I created the shaped card using Accent Essentials Cartridge for the Marquee shape, welded together to make the card. Used QuickKutz embossing folder for the background, DCWV Christmas stack from 2008 and Spica Glitter pen for the star and ribbon.


I had fun making these cards and can't wait to make more!

Thanks for stopping by!

Koala-t hugs,

Cathy


Wednesday, September 23, 2009

Another Chance to Win a Gypsy!

The excitement has been building and has reached a fever pitch! Tonight the Gypsy will be premiered on HSN and another site is giving one away!

Go to Cricut Cartridges Helper and follow the directions to get a chance (or in some cases SEVERAL chances) to win!

Give it a try, you just might win!


Tuesday, September 22, 2009

Sometimes Mistakes work out

Sunday, I decided to make a few cards. I've been wanting to try out the lacy tree shape on the Lyrical Letters cartridge since I got it. Well, it was summer when I first saw the shape and not in the mood for Christmas cards, so I finally got around to trying it out this past weekend. I wanted to make a design with the tree and a frame shape using Design Studio. I put the two shapes together, welded them and did a preview. I guess I didn't look at it close enough, and didn't notice it didn't cut the frame shape on the inside and the outside of the tree. I looked at the cut out shape, and at first thought, ooops, I goofed. Then, after looking at it again, I realized I could probably use it. So, here is the card I made using the "Ooops" shape....it came out pretty good!

I used Christmas print paper from American Crafts, red glitter paper from DCWV and used the Martha Stewart border punch and a few scattered "bling" on the tree.


Thanks for stopping by. I have more fun stuff to show in the coming days. Several cards and the projects I completed in a paper flower class I attended!

Have a great day!

Koala-t hugs,

Cathy

Monday, September 21, 2009

I got the MUSIC word book

I am enjoying creating word books with my Cricut and Design Studio software. I think maybe they are a bit simple, and am working on some more detailed books.

Here is one I completed for the craft fair. It measures 8" high x 12" wide. I made it basic black and white with red accents. I used the following cartridges: George, Winnie the Pooh Font, and Joy of the Season for the musical notes. I also used Sizzix Sizzlets for corners and border punches for some of the photo mats. It might be difficult to see, but the white letters for the book were all embossed using the Swiss Dots and the Cuttlebug.


I hope you enjoyed today's post. I will be back with more of my work. I thank you for visiting and especially when you leave comments!

Koala-t hugs,

Cathy