A couple weeks ago, I took a class at my local scrapbook store (Craft Fancy in Arlington Heights, IL) and learned how to make paper roses from grunge paper. I showed off my creations on the Cricut Message board and many asked how to make them, so I'm going to attempt to do a tutorial. I never considered myself a teacher, but with a Cricut class under my belt, and showing my mom a few things lately, maybe I can teach! If you read through these instructions, and something is not clear, or if you have any questions please contact me. There is a link to the left of this post where you can send me an e-mail. Here goes
First, let me tell you about Grunge paper. It is similar to the Tim Holtz Grungeboard, but it is thinner and has a smooth side and a very slight texture to the other side. It comes in 12 x 12 inch size and can be purchased on line. I purchased it at the local scrapbooking store.
Next, you'll need a template of a 5 petal flower. I had received a template from the class, but I found a great shape on the Cricut. I wanted to make different sizes so I looked through my Cricut shapes and found a 5 petal flower in the Plantin Schoolbook cartridge. But I had to use Design Studio to omit the opening in the center of the flower. (the shape is on page 76 with the Roly Poly Creative Feature selected and with Design Studio, deleting the inner circle). If you don't have Design Studio, there are punches available with a 5 petal flower.
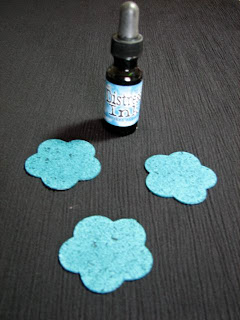
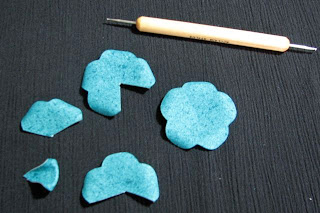
Step 1 Cut 3 flowers from grungepaper.

Step 2 Color the flowers. You can use acrylic paint, or alcohol inks but today, I used the reinker for the Tim Holtz China Blue Distress Ink. I used a makeup sponge and dabbed the ink on one side, let it dry to the touch and then inked the other side. Let it dry thoroughly, as it will take awhile to dry. Using alcohol ink will shorten the drying time. Acrylic paints dry pretty quickly also.

Step 3 With a pencil, place a small mark in the center of each flower for reference.


Step 4 - Make a cut in the first flower, cutting out one petal, using the pencil mark as point to cut to. With second flower, cut two petals out. In the third flower, make one cut to center point.
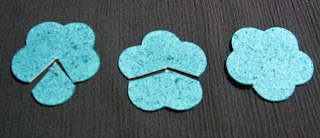

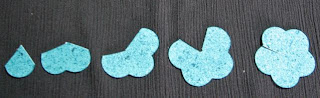
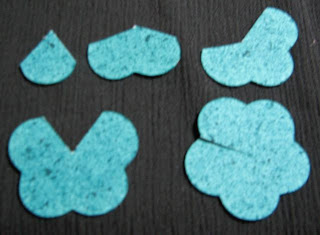
You will then have 5 pieces....one petal, two petals, three petals, 4 petals and 5 petals.
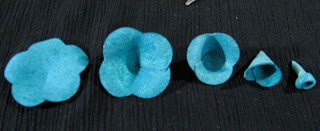
 Step 5 - Curl the edges of the petals. In the class, we used a embossing tool to curve the petal edge of the piece around the metal part of the tool. If you don't have this tool, you can just roll the edges of the petal under. The TOP is the smooth side of the paper (the textured side will be the underside of the flower)

 Step 5 - Curl the edges of the petals. In the class, we used a embossing tool to curve the petal edge of the piece around the metal part of the tool. If you don't have this tool, you can just roll the edges of the petal under. The TOP is the smooth side of the paper (the textured side will be the underside of the flower)
Step 6 - Gluing the edges. Starting with the smallest (1 petal) piece, roll it lengthwise, like a cone, with the points of the petal overlapping. I used a very small dab of gel superglue. It was the only adhesive I used that held. In the class we used glue dots, but I did not have luck with glue dots as the edges kept coming apart. I also tried Zip Dry, but the superglue gel (I used the gel as it did not drip all over) was the best hold. This is what the layers will look like when glued.
 Step 7 - Using small tipped scissors, clip out small circles in the bottom of the layers 1 - 3. Make the holes gradually larger from small to large layer, so that each layer fits into the next layer.
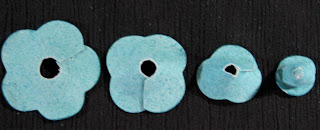 Step 8 This shows how the layers will fit together. The picture on the right shows the one petal shape inside the two petal shape. Using Aileen's Paper Glaze, put a small amount on the bottom of the first two petals together, then add the next layer (three petal shape), fit them together, and repeat process with the remaining layers. Paper Glaze takes a long time to dry, so don't put too much. Apply just enough to go around the bottom of where the layers meet.
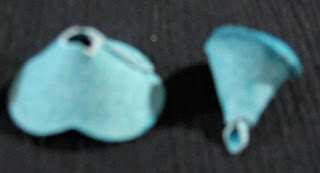 Once all glued together, this is what it should look like. (s0rry, the pics are a little fuzzy) You can leave the flower upside down to dry.
  This is a picture of the finished product.

I hope you enjoyed this tutorial and if you are so inclined, please leave a comment!
Thanks for stopping by. Have a great week!
Koala-t hugs,
Cathy
Cathy you are a born "teacher"... don't forget how to do it, when I ever find time I would love to try one and will probably need help, but your instructions are great... Beautiful...
ReplyDeleteGreat tutorial! Now I just have to buy some of that grunge paper!
ReplyDeleteThanks for the ideas.
ReplyDeleteWonderful tutorial. I'm going to try and make some. Thanks!
ReplyDeleteI'm so loving the tut, I make up my own all of the time and I use the same shape punch. ♥♥♥
ReplyDeleteReally cool flowers--I need to find a punch like that.
ReplyDeletewow that is way cool!
ReplyDeleteHi, Great idea! Got it via Splitcoast. So be ready for a lot more hits!
ReplyDeleteGreat tutorial from an SCS fan. Have a package of grungeboard waiting for just this type of projects. TFS!
ReplyDeleteThanks so much! You made it look simple. That takes a great teacher!
ReplyDeleteLooks great and you did a good job. Can it work with other papers?
ReplyDeleteGreat tutorial, watching the process really made me want to make some roses. Now to order some grunge paper Thanks.
ReplyDeleteBobbi
Great tutorial and beautiful results! You did "real good" :)
ReplyDeletethanks so much for the torotial! Great job!!!
ReplyDeletelooks quite a great post, it's having good information for research analysis. great job
ReplyDeleteYou are a star! Every version I've seen uses a 6 petal punch and of course all of mine are 5 so this is superb and you've just saved me the cost of buying a new punch! Fankoo x
ReplyDeleteHey Cathy...nice blog. I have made 2 dozen of the paper flowers. Thanks for the information. Have a great week. Susan
ReplyDeletethank you for the tutorial have just bought grunge paper and a cricut and am going to try roses to-day. what depth and speed did you use to cut out shapes. greetings from ireland.
ReplyDeleteMarie
I really like this blog. Thanks for the info.
ReplyDeleteviagra online
generic viagra
You make this seem so simple!
ReplyDelete